How to Install Lowering Blocks
Mark Simpson & Ross Kiehl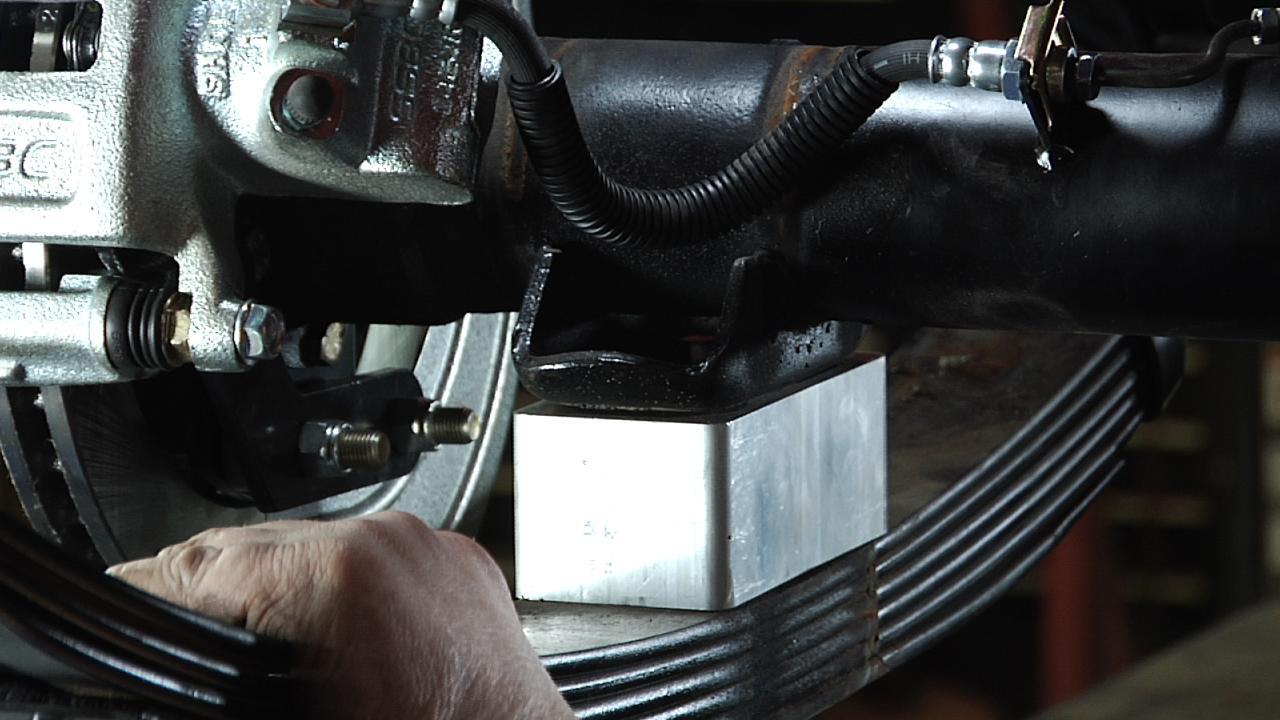
Video Player is loading.
Roadways across America were much different in the seventies and earlier than they are today. To compensate for rough roads and uneven pavement manufacturers gave their cars plenty of ground clearance, however today this elevated stance seems to rival that of most four wheel drive trucks. A popular conversion to give cars a more modern stance is the addition of lowering blocks. Mark Simpson takes us through the process of adding lowering blocks and important considerations that should be made when deciding exactly how much to lower a car.
In the 1950's Cars were really built with a high stance. Roads weren't as good as they are today. And, and they look a little strange. So today we're going to look at installing lowering blocks into the back of this 57 DeSoto. And lowering blocks is just a means of putting a block of space between the leaf spring and the rear axle.
And they'll bring the rear of the car down. This car in particular. We measured the Rocker Panel from the front to the rear. And we found that it has about three and a half inches rise from the front to the back. While the car isn't completely assembled there'll still be the weight of the gas tank and the upholstery and everything else that'll go into the car.
We know, from when we took the car a part that the backend was up considerably from where it should be. So we're going to install a set of two inch lowering blocks. The lowering blocks are available in a wide range of Heights. Whether you want three quarters of an inch of drop or four inches of drop. And the only thing that we need to take into consideration is we don't want the suspension components to get too low.
So if you get a flat tire or anything that a they actually drag on the pavement themselves. So with that, why don't we get started and get these lowering blocks in the car. An important consideration to take when making any chassis or steering engine modifications is to make sure no components of those fall below the scrubbed blind. The scrub line is a point from the wheel to the bottom of the wheel, tire next to it. And what this means is when a tire goes flat that there's no chassis components, that are actually falling below the scrub line.
If you do, then no dig, you know, you get a flat tire. The spring shackle could dig into the pavement and send the car out of control. In doing so. Also, get an important consideration is exhaust components are rarely considered a deterrent descrube line because the exhaust components can actually come below scrub line, but they're considered crushable. Crushable meaning that if your card did go down that the exhaust components will actually get damaged.
However, it wouldn't affect the travel or direction of the vehicle much unlike having like a spring shackle or a Shock Mount dig into the pavement. So with that, we've run a line here to kind of illustrate where the scrub line is and that's and we're about a half inch below the rim here because we're upgrading the car to 15 inch rims. And this currently has fourteens. And to the bottom of the tire next to it. With that we can now look at our Shock Mount.
Which is one of our lowest points on here. And we understand we have about three and a half or three and three quarters to four inches of distance between this and scrub line. So if we're going to drop in two inch lowering blocks that'll end up moving this two inches further down but still give us plenty of clearance between our car and the pavement. To get started. We'll loosen the nuts on the U bolt and start to get this separated from the leaf springs.
Now with the nuts removed from the U bolts we can get these U bolts tapped out of here and. Get ready for a new U bolt lowering part. All right. As you can see, once we're, there's a fair amount of tension, that's put on the U bolts themselves. And that's because the, the leaf springs are at an arc.
And the spring perch is flat. So now that we've relieved that tension, we're ready to put the lowering blocks in. Okay. The, what we've encountered here is that the pin on top of the lowering block is actually a little bigger on the lowering block. Then it is on the spring perch.
So we'll go ahead and we'll get this ready to drill those out. What that'll mean is we'll have to undo the other side and tilt the axle back and drill those out Okay. We've unfastened the other side and started to drill out the Pilot hole just a little bit larger. That way, they'll accept the pins on our lowering blocks. And we've done this side and we're going to do this side next, And now you can see the pin and the lowering block will fit into the spring perch on the axle.
Now we're ready to move everything back into position. Okay. Now, with the axle in position, we can start, go ahead and start getting the U bolt and the lower shock Mount both in place. So yeah onthis one, there's also a hole in the center of the shock Mount plate. That'll align with a bolt that align all the way through the leaf spring back.
And like with any chassis component using self-locking fasteners you want to have some kind of locking feature to your chassis fasteners, just so they don't leave you. We'll get the other side in place too. Before we start tightening. I'm going to raise the car up just a little bit. Give us some room here.
Now loosen this one up a little bit. U bolt is slid over a little bit, It's nice to have them up tight against the lowering block and the spring perch that helps keep everything in alignment. Okay that side done. We'll move over to the other. Okay with everything tight.
Next. We'll move on to cutting these bolts that are, The kits usually come with longer U bolts than it's needed and we'll just use a cutoff wheel to shorten up these U bolts. There, now with all the bolts cut off We're ready to put the shock absorbers back on Mount the wheels and get her back down on the ground and see where she sits. There, now that we got the wheels on good and tight. Cars deck down.
Off the jacks and on its own weight. On its own suspension. We, we can see how that, how the the change we've made is actually brought down the back two inches. Given the car much sleeker stance. A little more contemporary and given the ride overall a good look now.
Share tips, start a discussion or ask other students a question. If you have a question for an expert, please click here.
Already a member? Sign in
No Responses to “How to Install Lowering Blocks”