 For most classic car enthusiasts, a trip to the upholstery shop is about as welcome as a trip to the dentist. However, with a little planning and preparation, the experience can certainly be smoother and more rewarding than you might expect.
“It’s going to cost how much?” and “You can’t take my car in for how long?” are probably the two most commonly asked questions the first time any enthusiast visits an upholstery shop. The simple fact is, custom upholstery can be expensive, and if the upholsterer is worth his salt, be prepared to wait for it, in some cases up to two years before they even have room in their schedule for your car.
Proper planning is the key. Select an upholsterer you feel comfortable with and that can perform the style of work you’re looking for, inspect the quality of their work from fit to finish, and then make an appointment. This will get you on the list. Some shops require a non-refundable deposit just to secure your spot, so be prepared to tell them exactly when your car will be ready. A good rule of thumb is to add 3-6 months to your expected completion date, to deal with all of those unexpected items you know will come up. Keep in touch with your upholsterer as your project progresses and let them know as early as possible of any unexpected delays. If you must ultimately cancel your appointment, most shops will try to work with you to squeeze you in later.
The style of your interior and the materials you select will greatly influence the price of a completed job. Take photos of upholstery styles you like, tear them from magazines, or print them off from the internet. This will give your upholsterer an excellent idea of what your expectation is and will allow them to give you a more accurate estimate. Pricing for foam and other materials can change often, so keep in mind that it’s only an estimate. The extras can add up quickly, things like custom-built seats, trick consoles, exotic leathers, and custom-made stainless trim can send the bottom line soaring.
There are several steps you can take to ensure your trip to the upholstery shop goes smoothly with results that are better than you expected. We’ll explore some great money saving ideas.
OOH, OOH THAT SMELL
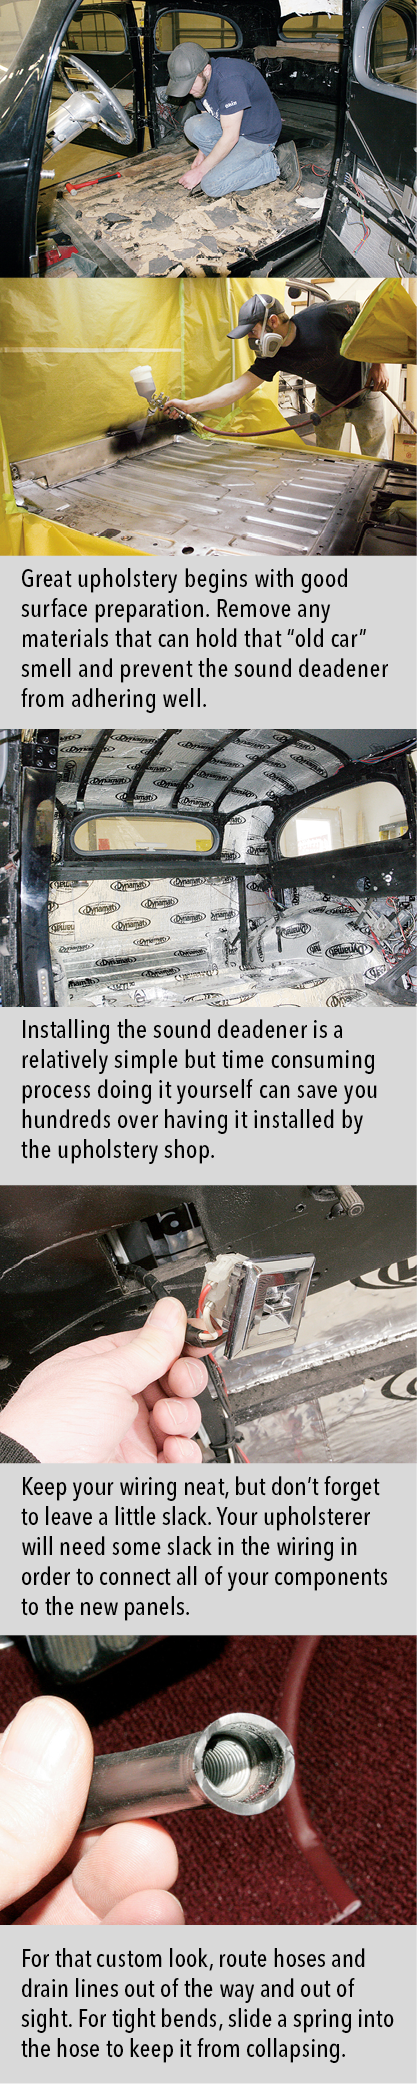
Let’s face it, old cars have a smell that uniquely reminds us of old cars…you know the smell. The last thing we want our new upholstery to smell like is an old car; to that end, it’s important to remove all materials that are capable of retaining odor. For our ’35, this meant stripping away the factory hardboard that was tarred to the floors, and sanding and refinishing the entire floor. The doors, side panels, and roof had similar materials that were removed and repainted earlier. Gary insisted, “It’s best to start with a clean slate, using only new materials. That way your new interior will smell as good as it looks, and the sound deadener and padding will remain where they’re supposed to.”
HOT AND COLD
All heater hoses and A/C lines should be in place, working, and tested before upholstery. The last thing you want is antifreeze leaking on your new carpet. Don’t forget to plumb the water drain tube on your in-dash A/C unit either. Most enthusiasts prefer a clean looking firewall and run their heat and A/C lines parallel to the dash and down the kick panels into the inner fender wells. Because these tight bends can often cause the heater hose to kink, consider sliding a spring in the hose to keep it from collapsing. All heat and A/C ductwork should be fastened to the main unit and pulled to the location the vents will be placed. If your vents are in the dash, they should be attached and working.
FROM THE FLOOR UP
Many early cars and trucks had the battery located below the floorboard. To keep the interior appearance clean and to avoid the need of an unsightly trap door in the middle of your floor, relocate the battery elsewhere in the car. Don’t forget to add a battery disconnect and remote charging posts. Likewise, many enthusiasts choose to locate their master cylinder below the floorboard as well. Use a remote fill master cylinder or convert the existing one to a remote fill style.
SEAL OUT THE WEATHER
Doors, hoods, and trunk lids all fit a little differently once the weather seals and bumpers are installed. Have them all in place and everything opening and closing properly before the car goes to the upholsterer. This will reduce the risk of unexpected delays and expense.
WORKING ELECTRICAL
All of your electrical connections should be made and working, prior to bringing your car to the shop. Most shops will not complete a car’s interior until everything is working properly. If they must resolve electrical problems you should expect upwards of $1,000 in additional expense. Save yourself real money here and make sure items like door poppers, door locks, power windows, wipers, third brake lights, dome lights, interior lights, radio, speakers, and the heater are all working before you take your car in. It’s important to keep some slack in the wiring. Fitting door panels with no slack in the wiring for power window switches can be next to impossible. If your upholsterer is to build a custom console with gauges, lights, and controls in it, secure a small box to the floor and run your wires to components in the box. And, don’t forget to leave plenty of slack in the wires.
KEEP THE BOARDS AT HOME
Most cars from the ’20s through ’40s are equipped with running boards, which the majority of shops prefer to have removed prior to arriving and definitely before work begins. The upholsterer will need to enter and exit your vehicle hundreds of times to complete your interior, so the risk of scratching them is greatly increased. Check with your upholsterer before bringing your car to the shop.
CUT OUT THE NOISE
The use of sound deadeners and heat shield materials is always a wise investment. Installation is as easy as cut, peel, stick, and roll. There is really no need to pay an upholstery shop hundreds of dollars to install what you could easily do yourself. The key to success is combining quality materials with good surface preparation. On our project ’35 Chevy, we previously installed an inexpensive brand of sound deadener in the doors, but later replaced the material in one of the doors with Dynamat Xtreme. The difference between the two doors was night and day, soon we found ourselves scraping out the old stuff throughout the car (see sidebar), and the difference was immediately evident, providing a cooler and quieter interior.
GLASS AND GARNISH
All side, wing, and quarter windows should be installed and operational with all felting in place. On some cars, the front and rear window seals/garnish moldings also secure the headliner material. On these vehicles, the shop will want you to leave them out until the headliner is in place. Check all garnish moldings for proper fit, especially on cars that have been chopped, as it’s common to have some gaps. They should be fixed to ensure a tight fit. All moldings should be painted before taking them to the shop, however if the plan is to have the upholsterer match the molding color to the interior materials, these should be primed and ready for paint.
HARDWARE UPDATE
Unless your upholsterer requests otherwise, it’s best to have all interior door handles, window handles, and vent window cranks purchased before you take your car in. Otherwise, you can expect several hundred dollars more added to your bill.
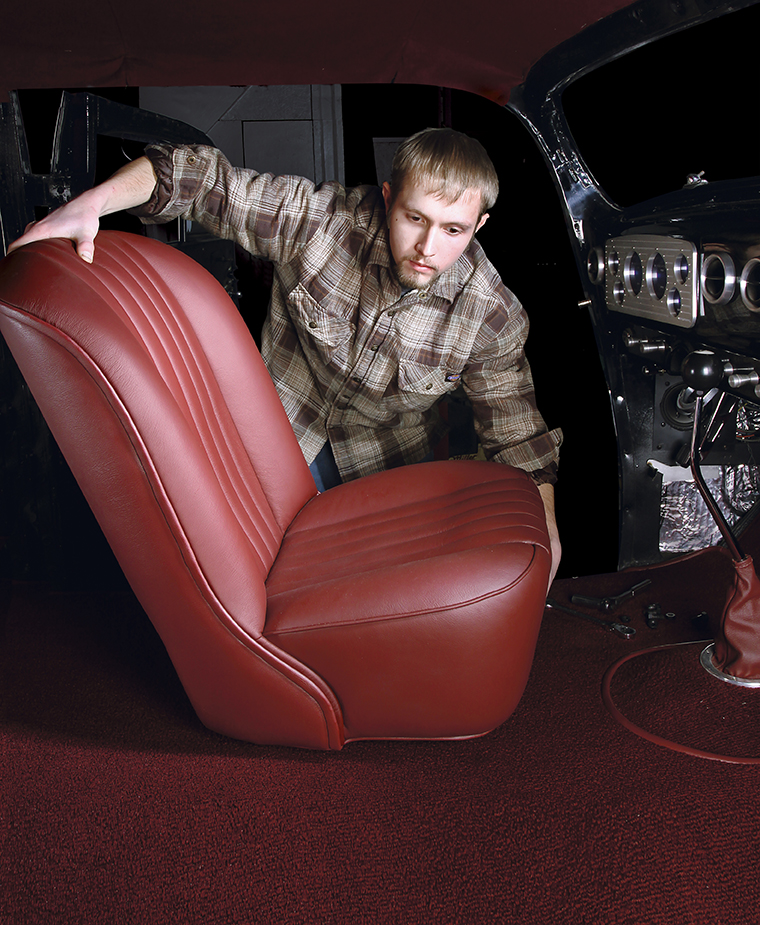
SETTLING ON SEATS
When mounting the seats in the car, it’s best to mount them lower than you believe they should be. Once the car returns from the shop with new foam and materials, you’ll likely find the fit “just right.” Check with your upholsterer. Many prefer that the owner test fit the seats before the upholstery is completed. Don’t forget to make sure your seats and seat tracks are square (both side-to-side and across the back, in relation to each other and the car), as it’s common for salvaged seats to be twisted. There should be at least two inches of space between the seats and the doors and some space between each seat. Seatbelt and three-point harness attachment points need to be added to the car during the initial build.
ARE YOU LEAKING?
Upholstery shops are clean; they have to be considering all of the expensive materials used in them. Take the time to eliminate any fluid leaks your car may have before taking it in; the upholstery you save may be your own! If your car has a leak, be certain to tell your shop so they can take the proper precautions.
PUT ON SOME MILES
Consider driving your car a few hundred miles before it is upholstered. Many newly constructed cars will have a few bugs that need to be worked out in the first few hundred miles. Wiring issues, solenoid problems, faulty gauges, and a host of other problems are all easier to resolve before the upholstery is in place. Our project car was driven for years before considering upholstery and with all the changes we made along the way we’re glad we waited.
SOFT DEADLINES
Custom automotive interior design is as much an art as it is a process. As the old adage goes, “The better things in life are worth waiting for.” It’s never a good idea to push your upholstery shop to make a car show deadline. After all, the car show will be over in just a couple days, but the results of a hastened job will likely be around as long as you own the car.
These are just some of the steps you can take to save a few dollars and make your next project first rate. Most shops can assist you in making sound decisions early in your next car build. Consulting them as your car progresses will help prevent costly upholstery pitfalls.
thx for all the good info. Looking for a shop to do my 72 Eldo this winter. needs just about everything. Any recommendations? Located in Bowie, MD 20715 but will drive within 250 miles thx
I live in Argentina and drive since 30 years a Ford Monterey 61 convertible. The original upholstery is getting bad. Where can a get in the USA a replacement including the original dashboard ? Thank you for assistance
verry nice ,have done all this before and learned from my mistakes too
Im looking for upholstery material for an 89 chevy s10 blazer. I can reply with pictures if needed. Thank you Hello Alfred, thanks for posting. You would have to find someone in your local area to find that. Sincerely, Sarah Classic Car Restoration Club
I'm getting ready to do the interior on my '69 Mustang Fastback. The car had been sitting for years in a couple of different garages as we have moved around. Unfortunately, mice took up residence in the car for quite some time and the small is terrible. What is the best method and materials (cleaners) to use to prep the metal to help eliminate the smell. Should I also paint or treat the metal before installing the sound/heat barrier in the car?
Need help with a 1966 Ford T-Bird town hardtop interior. Please contact me 478 318 3897
Thanks--some sound advice here-
.Great information. I had Custom Interiors by Stitch in Rustburg, Va. do my 1933 CHEVY last year. BIG mistake. They not only did not know what they were doing, they stole items off my car. I have filed a police report and hope to get some sanctification soon. I did find out (too late) that some of their 5 star ratings were made up. Anyway, I wish that I had this seen this publication before I hired Custom Interiors by Stitch
Hi Mark, This is my first visit to your blog. I like your post about preparing YOUR CLASSIC CAR FOR UPHOLSTERY. It is a great article with sharing beautiful pics and with great information. I want to read more about your blog. Thanks for sharing the wonderful post. Have a great weekend.
I am restoring my 1972 Pontiac LeMans GT Sport that I purchased new back in Dec 1971. Your write up on the upholstery info is excellent. If anyone has any other ideas, please let me know.